Serving Multiple Load Balancers with a Single GCE Instance on Unique Ports
🚀 Introduction
Sometimes you might want to expose multiple applications running on different ports on the same Compute Engine (GCE) instance — maybe for dev/testing, lightweight microservices, or simple web apps. In this guide, I’ll show you how to serve multiple ports from a single GCE instance by configuring multiple HTTP load balancers, each routing traffic to a different port.
This method allows you to use one instance group (even unmanaged) as the backend for multiple load balancers, each targeting a specific port.
Pre-requisites:
A compute engine instance that runs multiple applications on various ports.
In my case, I have deployed
→ a simple web application using nginx on port 80
→ a simple web application using apache2 on port 8080
I have a compute engine instance that serves two applications on various ports as follows:
- Nginx application on port 80
- Apache2 application on port 8080
Let’s dive into config
Now, we’ll need to create an instance group, either a managed instance group or an un-managed instance group. For this setup, I’ll go with the un-managed instance group.
Creating an Unmanaged Instance Group
Search for ‘Instance Group’ in the GCP console to begin creating a new one.
Click on Create Instance group → Select New unmanaged instance group and fill in the details
Make sure to add the port mapping as per your setup.
I have added my nginx port 80 and apache2 port 8080. (You can customize your port mapping names and ports as per your need).
Click Create.
Creating Load Balancer for Port 80 (nginx)
Search for Load balancing and click on create load balancer:
For Type of load balancer → select Application Load Balancer (HTTP/HTTPS) and click Next
For Public facing or internal → select Public facing (external) and click Next
For Global or single region deployment → select Best for global workloads and click Next
For Load balancer generation → select Global external Application Load Balancer and click Next
Click Configure
Next, you’ll be redirected to configure the load balancer.
Frontend:
Give a name for the load balancer and for the fronted, I am leaving all the options to default as I want to run my application over http protocol and port 80.
Backend configuration:
Under the new backend, when you select the instance group, a pop will show up with the available ports that you can choose from.
These options appear because we defined named ports during the instance group setup.
From the dropdown, select the nginx (port 80) option and click Use selected port name.
Scroll down and click done.
Click on Health check and create a new health check as follows and save.
Next, click on create to create the backend with the set configurations.
Select the nginx-backend that we have created earlier, leave the routing rules to defaults.
Review the configuration from the Review and finalize option and click create
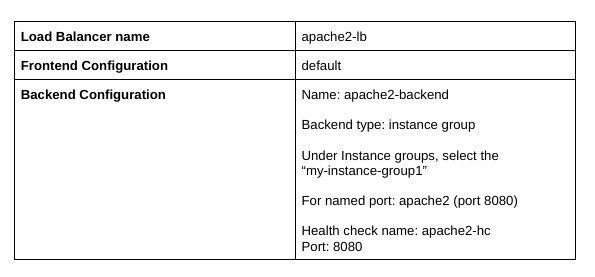
Creating Load Balancer for Port 8080 (apache2)
Similarly, create another load balancer with the following configuration:
Review and finalize the configuration and click on Create.
Testing the Setup
Now, open each load balancer that we have created to identify the frontend IP.
Now, when we try to access the IP from the browser, we’ll see that the application varies as per the load balancer’s backend configuration.
When we access the frontend IP of nginx-lb load balancer, we are served with the nginx application running over 80.
When we access the frontend IP of apache2-lb loadbalancer, we are served with the apache2 application running over port 8080.
Thus, we were able to expose 2 applications running on ports 80 and 8080 in a single compute engine across 2 load balancers with the same instance group as a backend.
Bonus Tips
- You can extend this setup to more ports/services.
- Consider containerizing each app for better isolation.
- For production, use managed instance groups with auto scaling.
- Add HTTPS via SSL certificates for better security.
If you found this helpful, feel free to share or drop a comment! 🙌
Happy cloud building ☁️💻